Have you ever wanted to start a Kannada blog in 2026 but weren’t sure how or where to begin?
In 2026, creating a blog in your native language is not just a trend—it’s a powerful way to reach Kannada readers, share valuable ideas, and build a long-term online income.
Today, more than 45 million people speak Kannada, yet the internet still has very limited high-quality Kannada content. This gap means there is a massive opportunity for you to stand out. Whether your passion is recipes, education, poetry, technology, news, lifestyle, or personal stories, starting a blog in Kannada (ಕನ್ನಡದಲ್ಲಿ ಬ್ಲಾಗ್ ಹೇಗೆ ಪ್ರಾರಂಭಿಸಲು) helps you connect deeply with your audience. Content feels more trustworthy when it’s in the reader’s mother tongue.
The good news? You don’t need any technical skills. With tools like WordPress, simple editors, and beginner-friendly hosting providers such as Hostinger, launching a Kannada WordPress blog (ಕನ್ನಡ ವರ್ಡ್ಪ್ರೆಸ್ ಬ್ಲಾಗ್) has become easier, faster, and more affordable than ever.
In this complete guide, you’ll learn:
- Why starting a Kannada blog in 2026 is a smart idea
- Step-by-step instructions to set up your blog using WordPress
- How to write and publish posts in Kannada
- How to monetize your Kannada blog with ads and affiliate marketing
- Examples of successful Kannada bloggers to inspire you
Let’s begin your journey and build your first Kannada blog today! (ಇಂದು ನಿಮ್ಮ ಮೊದಲ ಕನ್ನಡ ಬ್ಲಾಗ್ ಅನ್ನು ಕಟ್ಟೋಣ!)
Quick Kannada Blogging Checklist 2026
| Step | What to Do | Why It Matters | Recommended |
|---|---|---|---|
| 1 | Choose your blog niche and name | Helps you stay focused and build authority | E.g. Tech & AI Tools, Personal Finance & Side Hustles, Digital Marketing, Blogging & Making Money Online, Health, Wellness & Biohacking |
| 2 | Get hosting with a free domain | Reliable hosting improves speed and SEO | Hostinger – Free domain for 1st year. Use code BLOGGINGJOY for extra 10% off |
| 3 | Install WordPress (1-click setup) | Quick setup without any technical skills | Hostinger WordPress Auto Installer |
| 4 | Choose a fast and lightweight theme | Affects speed, SEO, and design flexibility | KadenceWP – Easy to customize & mobile-friendly |
| 5 | Add essential plugins | Improves security, SEO, and performance | Yoast SEO, WPForms, WP Rocket |
| 6 | Enable SSL and backups | Keeps your site secure and safe from data loss | Hostinger offers free SSL and weekly backups |
| 7 | Write and publish your first post | Builds content and attracts visitors | Start with 3–5 useful, keyword-rich articles |
| 8 | Monetize your blog | Earn income from your traffic | Google AdSense, Affiliate Marketing, or Sponsored Posts |

Why Starting a Blog in Kannada in 2026 Is a Smart Move
In today’s digital age, content is everywhere—but regional language content is still underrepresented. While millions of new blog posts are published daily in English, Kannada content remains relatively scarce online, making 2026 the ideal time to create a blog in your native language and stand out.
Here’s why blogging in Kannada is not only smart but also highly rewarding:
Kannada is the 27th Most Spoken Language in the World
Over 45 million people speak Kannada—mainly in Karnataka, but also in Maharashtra, Andhra Pradesh, and abroad. Yet, when you search Google in Kannada, the number of good-quality blogs is still low.
That’s your advantage.
While English blogs face massive competition, a Kannada blog has a much better chance of ranking on Google, building a loyal audience, and becoming an authority in its niche.
Local Language = Higher Trust + Better Engagement
Most Kannada speakers prefer reading in their own language—especially when it comes to daily life topics like cooking, career advice, parenting, health tips, or entertainment.
When you write in Kannada:
- Readers feel more connected
- Your blog posts feel more personal and relatable
- You build deeper trust and longer page visits—two key factors for SEO
Fact: According to Google India, regional language searches are growing faster than English, especially on mobile phones. Kannada is one of the fastest-growing languages in digital search.
Less Competition = Easier to Rank
Imagine trying to rank an English blog on “healthy breakfast recipes”—you’d be competing with millions of blogs worldwide.
Now try the same topic in Kannada: “ಆರೋಗ್ಯಕರ ಉಪಹಾರ ರೆಸಿಪಿಗಳು”
You’ll likely face much less competition—and if your content is helpful, Google will reward it with better visibility.
With smart keyword use, proper formatting, and regular publishing, you can rank a Kannada blog faster and attract consistent organic traffic.
Growing Demand for Kannada Content = Monetization Potential
Brands are now actively looking to advertise in local languages. With Kannada being the official language of Karnataka and widely spoken across South India, advertisers are shifting their focus toward localized campaigns.
That means:
- Google AdSense supports Kannada
- Affiliate marketing in Kannada works—especially for Amazon, Flipkart, and ed-tech
- You can earn via brand partnerships, paid articles, or digital product sales in Kannada
Kannada Bloggers Are Still Early Movers
Unlike English blogging, where niches like tech or travel are already saturated, Kannada blogging is still in its early stages. If you start now, you’re positioning yourself as an early voice in your niche.
Just imagine: 2 years from now, you could be one of the top-ranking Kannada bloggers in your category—simply because you started early and stayed consistent.
Kannada Blog Examples to Learn and Get Inspired
If you’re unsure what kind of content to create, the best way to begin is by looking at what successful Kannada bloggers are doing right now. While there may not be thousands of Kannada blogs out there (yet), the ones that exist are thriving because they cater to focused audiences.
Here are some real and topic-based examples of Kannada blogs that are performing well—and what you can learn from them.
1. Vishwakannada.com – News, Culture & Opinions
This blog focuses on Kannada literature, socio-political issues, and cultural commentary. It brings thoughtful writing to a niche that deeply connects with local readers.
What to learn:
Pick topics that are locally relevant and emotionally resonant. If you can write with depth, even serious themes can draw a loyal audience.
2. MyKannadaKitchen.com (Fictional Example) – Cooking and Recipes in Kannada
Food blogs in Kannada do incredibly well, especially if they include traditional recipes, step-by-step visuals, and tips passed down through generations.
What to learn:
People love recipes in their own language. Adding audio instructions, printable PDFs, or YouTube videos in Kannada can multiply your reach.
3. KannadaCareerGuide.in – Government Exam Tips & Career Advice
This niche blog targets students preparing for KPSC, SSC, and UPSC exams in Karnataka. It shares resources, model questions, study tips, and updates—all in Kannada.
What to learn:
Educational blogs in Kannada attract serious, long-term traffic. If you’re a teacher or student, this is a powerful niche to consider.
4. NammaTravelTales.com (Fictional) – Travel Stories from Karnataka
A regional travel blog written in Kannada, exploring hidden places in Karnataka—from Malnad to coastal villages.
What to learn:
Travel blogs in Kannada have low competition and high potential, especially when you combine storytelling, history, and visuals.
5. KannadaQuotesHub.com – Quotes, Wishes, and Emotional Posts
This type of blog focuses on Kannada quotes for birthdays, festivals, motivation, and love messages—very popular among WhatsApp and social media users.
What to learn:
Short, shareable content can drive viral traffic. Use trending topics and festivals to create timely posts.
These blogs show that you don’t have to compete with English blogs to be successful. By choosing the right niche and writing consistently in Kannada, you can attract thousands of loyal readers—and build a blog that grows with time.
Step-by-Step Guide to Start a Kannada Blog with WordPress (Using Hostinger)
So, you’re ready to start your Kannada blog—but what tools do you need? Good news: you don’t need to hire a developer or be a tech expert. With a little guidance, you can launch your blog in under 60 minutes—and the best part is, you can do it all using WordPress and Hostinger.
Here’s how to set up your Kannada blog step by step.
Step 1: Choose Your Blog Topic (Niche) in Kannada
Start by deciding what you’ll write about. Kannada blogs do well when they focus on specific topics. Instead of writing about “everything,” pick a niche that solves a problem or entertains a specific group of people.
Popular Kannada blog niches:
- Recipes and food reviews
- Exam preparation and study tips
- Kannada movie reviews or entertainment updates
- Health and wellness tips in Kannada
- Local travel stories and weekend getaways
- Kannada literature, poems, and stories
💡 Tip: Search in Kannada on Google and YouTube to discover what people are already searching for. Use those keyword ideas in your content.
Step 2: Pick a Domain Name That’s Easy to Remember
Your domain name is the address of your blog—like nammablog.in. Try to keep it:
- Short and meaningful
- Easy to pronounce in Kannada or Manglish
- Related to your blog topic
For example, if your blog is about Kannada recipes, something like KannadaRuchis.com could work well.
👉 You’ll get a FREE domain when you buy hosting from Hostinger, so no need to pay extra elsewhere.
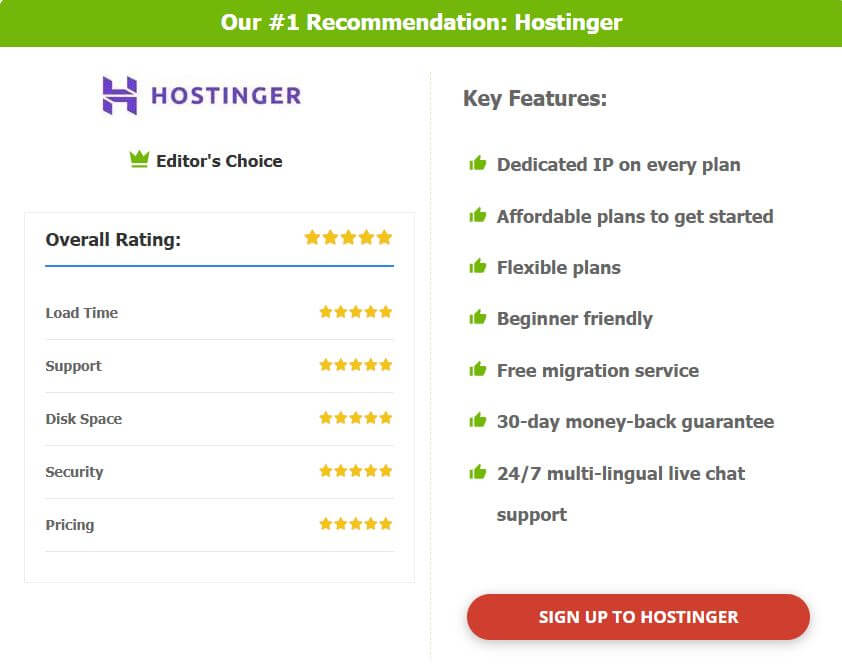
Step 3: Get Web Hosting – Why We Recommend Hostinger for Kannada Bloggers
Here’s where many beginners get confused: web hosting is where your blog lives on the internet. It must be fast, secure, and beginner-friendly.
And that’s exactly why we recommend Hostinger.
Why Hostinger is Perfect for Kannada Bloggers in 2026:
- ✅ Free domain name for 1 year – no extra cost
- ✅ Fast servers in India – your blog loads quickly for local readers
- ✅ Affordable pricing – plans start at just ₹69/month
- ✅ Free SSL certificate – makes your site secure (https)
- ✅ Easy-to-use dashboard – beginner-friendly, no coding required
- ✅ One-click WordPress install – saves you time and effort
- ✅ 24/7 customer support – available in case you get stuck
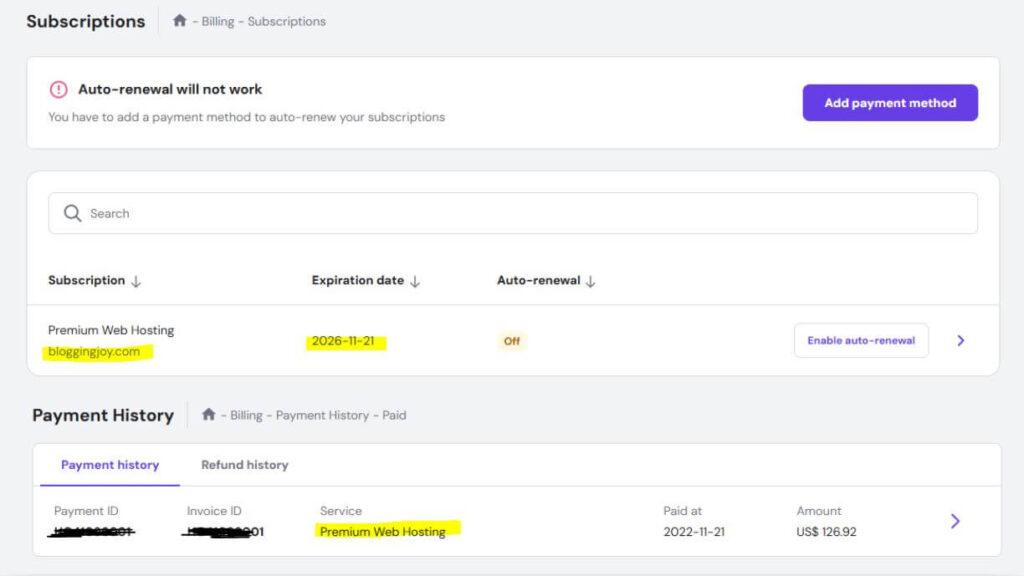
✅ Which Hosting Service Is Used by This Website?
This website is proudly hosted on Hostinger’s Premium Web Hosting Plan.
After testing multiple hosting providers over the years, I chose Hostinger for its speed, uptime reliability, and unbeatable pricing. The Premium Plan offers everything needed for a fast, secure, and scalable WordPress site — including free domain, free SSL, and LiteSpeed servers that improve loading times significantly. Here is the proof of my purchase details, expiration date and everything that you must know.
And the best part? You can use the exclusive coupon code BLACKFRIDAY to get an extra discount on top of their already affordable plans. If you’re planning to get AdSense approval or want better RPMs, moving to Hostinger is a smart long-term investment.
🔥 Get Up to 85% OFF on Hostinger Hosting – Limited Time Deal!
Launch your website with blazing-fast hosting at just a fraction of the price. Use Coupon Code: BLACKFRIDAY at checkout for extra savings.
✅ Free Domain | ✅ Free SSL | ✅ 24/7 Support | ✅ WordPress Optimized
👉 Click Here to Grab Hostinger’s 85% Discount Now – Don’t Miss Out!
Step 4: Install WordPress in One Click
Once you sign up with Hostinger and claim your free domain, go to your hosting dashboard. You’ll see an “Auto Installer” option—click it, choose WordPress, and follow the instructions.
In less than 5 minutes, your blog will be ready. During setup, select Kannada as your website language if you want your admin dashboard to reflect it.
Step 5: Customize Your Kannada Blog Design and Features
You now have a working blog! It’s time to make it look good and function well.
Customize your blog by:
- Choosing a mobile-friendly WordPress theme (e.g., Astra or Kadence)
- Uploading a logo (you can create one for free using Canva)
- Installing essential plugins:
- Yoast SEO – to optimize your blog for search engines
- WPForms – to create contact forms
- Site Kit by Google – to connect Google Analytics and Search Console
- TranslatePress – if you want bilingual content (Kannada + English)
💡 Most WordPress themes fully support Unicode Kannada script, so you can write directly in your native language without issues.
How to Write Blog Posts in Kannada Using WordPress
Now that your Kannada blog is live, it’s time to do the most important thing—start writing content. But if you’ve never written blog posts in Kannada before, you might wonder: Can WordPress handle Kannada typing? Do I need any extra plugins or tools?
The short answer is: Yes, WordPress fully supports Kannada, and writing in your native script is easier than you think.
You Can Write in Kannada Natively on WordPress
Modern WordPress themes and editors are Unicode-compatible, which means you can directly type or paste Kannada content into the editor without worrying about errors or formatting issues.
Most Kannada bloggers use one of the following input methods:
1. Google Input Tools (Web and Chrome Extension)
- Type Kannada words phonetically in English (e.g., “nanna hesaru”)
- It converts it into Kannada script: ನನ್ನ ಹೆಸರು
- You can either type directly in the blog editor or use Google Docs and paste it
➡ Try it here: Google Input Tools
2. Gboard (Android) or Kannada Keyboard Apps
- If you’re blogging from your phone or tablet, install Gboard and choose Kannada as your input language
- It supports both typing and voice-to-text in Kannada
- Great for publishing short blog posts, quotes, or updates directly from mobile
3. Baraha, Lipikaar, or Nudi Tools (For Desktop)
- These offline tools allow Kannada typing in Windows/Linux with additional control
- Baraha is useful for long-form content writing or offline drafts
💡 Tip: Always use Unicode Kannada text for your blog. It improves SEO, makes your content readable on all devices, and ensures Google indexes your posts correctly.
Avoid Using Manglish in Long-Form Blog Posts
Manglish (writing Kannada in English script like “yen samachara?”) is okay for casual content like social media, but not ideal for blog posts. Google doesn’t understand it, and it won’t help your blog rank in Kannada keyword searches.
For better search visibility and professional appeal, always write in Kannada script using Unicode-supported tools.
Formatting Tips to Make Kannada Posts Easier to Read
Even if your content is great, poor formatting can reduce engagement. Here’s how to structure your Kannada blog posts for maximum readability:
- ✅ Use short paragraphs (2–3 lines)
- ✅ Break content using H2 and H3 subheadings in Kannada
- ✅ Use bullet points or numbered lists for instructions
- ✅ Add images with alt text in Kannada (SEO boost!)
- ✅ Use bold text or colored highlights for key points
- ✅ Add a featured image for every post—it improves click-through rate
Useful WordPress Plugins for Kannada Bloggers
| Plugin | Use | Why It Helps Kannada Bloggers |
|---|---|---|
| Yoast SEO | SEO optimization | Works with Kannada titles & meta tags |
| WPForms | Contact forms | Let readers send questions in Kannada |
| TranslatePress | Bilingual site | Add English + Kannada content on the same blog |
| Site Kit by Google | Analytics & search | Track traffic, clicks, and keyword performance |
These plugins don’t require coding and work perfectly with Kannada content. Just install and activate them from your WordPress dashboard.
Writing in Kannada is not just possible—it’s powerful. You connect better, rank faster, and attract readers who are looking for content in their own language. Once you publish 10–15 solid posts, your blog will start gaining visibility naturally through Google Search.
Top Ways to Make Money from a Kannada Blog
You’ve set up your blog, written useful articles, and started getting traffic. Now it’s time to turn that effort into income.
Many people assume that only English blogs can make money—but that’s no longer true. In 2026, Kannada blogs have more monetization options than ever, thanks to increased interest in local content and regional audiences.
Here are the most reliable and beginner-friendly ways to monetize your Kannada blog:
1. Earn Through Google AdSense on Your Kannada Blog
Google AdSense is the easiest way to start earning. Once your blog has at least 15–20 quality posts and follows basic guidelines, you can apply for AdSense.
AdSense automatically shows relevant ads on your blog in Kannada or English. You earn money every time someone views or clicks on those ads.
Tips to increase your AdSense earnings:
- Focus on searchable topics like health tips, recipes, education
- Write posts that answer common questions in Kannada
- Use proper ad placements (top of the page, within content, sidebar)
- Make sure your blog is mobile-optimized (most Kannada readers use phones)
💡 Kannada content is eligible for AdSense. Just ensure your content is original, clean, and valuable to readers.
2. Promote Products Using Affiliate Marketing (in Kannada)
Affiliate marketing means promoting products or services using a unique referral link. When someone buys through your link, you earn a commission.
Popular affiliate programs for Kannada bloggers:
- Amazon India Affiliate Program – Review products in Kannada
- Flipkart Affiliate Program – Great for local gadgets or fashion
- Hostinger Affiliate Program – Recommend blog hosting in Kannada
- Ed-tech platforms – Promote online courses or PDFs for exam prep
Example: Write a blog post on “2026 ರಲ್ಲಿ ಟಾಪ್ 5 ಕಿಚನ್ ಉಪಕರಣಗಳು” and include affiliate links. When readers click and buy, you earn.
💡 Always be transparent with your readers. Explain why you recommend a product in Kannada and how it benefits them.
3. Sponsored Posts & Brand Collaborations
As your traffic grows, brands—especially local startups—may reach out for collaborations. You can charge them to:
- Write sponsored articles in Kannada
- Review their app, product, or service
- Include their links in your popular blog posts
You can also pitch local businesses yourself—offer them promotion on your blog in exchange for a fixed fee or product sponsorship.
Example niches for sponsorships: Kannada movie blogs, food blogs, fashion tips, education, local events.
4. Sell Your Own Digital Products or Courses in Kannada
If you have specific skills—like cooking, public speaking, teaching, or designing—you can create and sell digital products.
What you can sell from your blog:
- Kannada-language eBooks (recipes, how-to guides, poetry)
- Online courses (on Teachable, Gumroad, or LearnDash)
- PDF notes or study materials for KPSC/UPSC aspirants
- Printable planners, greeting card templates in Kannada
💡 Add a “Shop” page to your blog and use tools like WooCommerce or Instamojo to collect payments from Indian users.
5. Accept Reader Donations or Crowdfunding Support
If you’re writing high-value content like poetry, tutorials, or community news, some readers may be happy to support you.
Use platforms like:
- BuyMeACoffee
- Patreon
- Instamojo donations (India-specific)
Include a line like this at the end of posts:
ಈ ಲೇಖನ ನಿಮಗೆ ಉಪಯುಕ್ತವಾಯಿತುವೆಯಾ? ನನ್ನ ಕೆಲಸವನ್ನು ಬೆಂಬಲಿಸಲು ₹50 ದೇಣಿಗೆ ನೀಡಿ.
(“Did you find this article useful? Support my work with a ₹50 donation.”)
Even small donations can add up over time.
6. Offer Freelance Services via Your Blog
Your blog is more than content—it’s your portfolio. If you’re good at writing, translation, design, or tech, use your blog to offer services.
Examples:
- Kannada-English translation
- Blog setup for other beginners
- Content writing for businesses in Kannada
- Voice-over or scriptwriting services
Add a “Hire Me” or “Services” page with your WhatsApp number or contact form.
How Much Can You Earn from a Kannada Blog?
Your earnings depend on your blog’s traffic, niche, content quality, and monetization strategy. Most regional-language bloggers typically start earning ₹5,000–₹15,000 per month within the first 6–12 months. As your content grows and your audience expands, your Kannada blog can realistically reach ₹30,000–₹50,000+ per month, and even more with proper SEO and consistent posting.
If you want an estimate of how much your Kannada blog can earn, you can use this free AdSense Earnings Calculator, which gives a clear idea of how RPM and pageviews affect income.
👉 AdSense Earnings Calculator
If you’re planning to promote products, tools, or services, this Affiliate Earnings Calculator helps you understand how many clicks and conversions you need to reach your income goals.
👉 Affiliate Earnings Calculator
You don’t need to use every monetization method right away—start with one (such as AdSense or affiliate marketing) and slowly build a diversified income stream as your Kannada blog grows.
Frequently Asked Questions (FAQs)
Can I start a blog in Kannada without spending money?
Yes, you can start a free Kannada blog using Blogger or WordPress.com, but these platforms give you limited control, and you won’t be able to monetize effectively. If you’re serious about growing your Kannada blog and earning online, it’s better to invest in a self-hosted WordPress blog using a reliable and low-cost provider like Hostinger.
What is the best platform for starting a Kannada blog in 2026?
The best platform to start a Kannada blog in 2026 is WordPress.org with self-hosted hosting. It fully supports Kannada typing, allows complete customization, and works well with SEO tools. Hosting your blog with Hostinger gives you access to a free domain, free SSL, fast performance, and a simple one-click WordPress setup, making it ideal for Kannada bloggers.
Can I earn money from a Kannada blog using Google AdSense?
Yes, you can earn money from a Kannada blog using Google AdSense. Kannada is one of the supported languages in AdSense’s content policies. Once your blog has enough original content and complies with AdSense guidelines, you can apply and start showing ads in Kannada or English to earn revenue based on traffic and engagement.
How do I write blog posts in Kannada using WordPress?
You can write blog posts in Kannada on WordPress by using tools like Google Input Tools or Gboard, which allow phonetic typing or direct Kannada script input. WordPress supports Unicode Kannada, so you can type, format, and publish content directly without any special coding or plugins.
Is it better to write in Kannada script or Manglish?
It is always better to write in Kannada script using Unicode fonts instead of Manglish. Kannada script improves user readability, SEO rankings, and ensures your blog can appear in Google search results for Kannada keywords. Manglish may be easier to type, but it doesn’t help your blog get discovered by people searching in Kannada.
How many blog posts should I publish before applying for AdSense on my Kannada blog?
You should aim to publish at least fifteen to twenty original blog posts in Kannada before applying for Google AdSense. Make sure your site has essential pages like About, Contact, and Privacy Policy, and that your content is informative, easy to navigate, and follows AdSense’s content quality guidelines.
Can a Kannada blog be profitable in 2026?
Yes, a Kannada blog can be highly profitable in 2026. As more users search the internet in Kannada, there’s growing demand for local content. Kannada bloggers are already earning through AdSense, affiliate marketing, sponsored posts, online courses, and freelance services. With less competition and a growing digital audience, blogging in Kannada is a smart long-term opportunity.
Is it possible to write in Kannada on mobile for WordPress blogs?
Yes, you can easily write Kannada blog posts from your mobile phone by using Gboard or other Kannada keyboard apps. These tools work smoothly with the WordPress mobile app and allow you to type, edit, and publish blog content directly in Kannada, even if you’re on the go.
ಕನ್ನಡದಲ್ಲಿ ಬ್ಲಾಗ್ ಹೇಗೆ ಪ್ರಾರಂಭಿಸಬೇಕು?
ಡೊಮೇನ್ ಖರೀದಿ, ಹೋಸ್ಟಿಂಗ್ ಆಯ್ಕೆ (Hostinger जैसे), WordPress ಇನ್ಸ್ಟಾಲ್ ಮಾಡಿ, ನಂತರ ನಿಮ್ಮ ಮೊದಲ ಕನ್ನಡ ಪೋಸ್ಟ್ ಬರೆಯಬಹುದು. ಇದು ಬಹಳ ಸುಲಭ.
Do Kannada blogs rank well on Google?
Yes. Because Kannada content has low competition, you can rank quickly with quality articles, on-page SEO, and helpful content.
Final Thoughts – Is Starting a Kannada Blog in 2026 Worth It?
Yes, without a doubt—starting a Kannada blog in 2026 is one of the smartest digital moves you can make.
Here’s why: the demand for high-quality content in regional languages is growing faster than ever, but the supply is still limited. Kannada is spoken by over 45 million people, yet when they search for topics online—be it recipes, education, health, or local travel—they often find very few reliable Kannada resources. That’s where your blog can make a difference.
Whether you want to share your knowledge, build a personal brand, or earn consistent income online, Kannada blogging offers a direct path to all three. With less competition, higher reader engagement, and growing monetization options like AdSense, affiliate programs, and digital products, your Kannada blog can grow into a long-term digital asset.
And the best part? You don’t need to be a tech expert to get started. With WordPress and Hostinger, you can launch your blog in less than an hour—no coding, no confusion, just a step-by-step process designed for beginners.
So don’t wait for the perfect time. This is the perfect time.
👉 Get started with Hostinger today – Claim your free domain, install WordPress in one click, and launch your Kannada blog the smart way.
👉 Start your blog now with Hostinger (Use coupon code BLACKFRIDAY during checkout to get extra savings.)
Because your voice deserves to be heard—in your language.
More articles to read
- How to Start a Blog in Hindi Language in 2025
- How to Start a Blog in Kannada Language in 2025
- How to Start a Blog in Urdu Language in 2025
- How to Start a Blog in Gujarati Language in 2025
- How to Start a Blog in Tamil Language in 2025?
- How to Start a Blog in Telugu Language in 2025
- How to Start a Blog in Bengali Language in 2025
- How to Start a Blog in Marathi Language in 2025
- How to Start a Blog in Punjabi Language in 2025
- How to Start a Blog in Odia Language (2025 Guide)
- How to Start a Successful Malayalam Blog in 2025
- How to Start a Blog in Konkani in 2025
- How to Start a Blog in Maithili in 2025
- How to Start a Blog in Assamese in 2025